Servlet Container, Servlet, Filter 와 Spring Boot에서의 사용법 정리
서론
이번 글은 내가 Spring Boot에서 Filter를 등록하기 위해 방법을 알아보던 중, 이제까지 제대로 이해 못하고 있던 관련된 내용들에 대해 공부하게 되었고 해당 내용을 정리하려 한다.
Java Servlets API
자바 서블릿 API는 서블릿을 작성하기 위한 클래스와 인터페이스를 제공하는데, 여기에는 HttpServletRequest, HttpServletResponse, Servlet, Filter, Listener 등이 포함되어 있고 이를 통해 request와 response를 다루고 task를 수행할 수 있다. Servlet API는 Java EE platform에 포함되어 있다. 여기에서 중요한 개념인 Servlet Container, Servlet, Filter 등에 대해 알아보자.
Servlet
서블릿은 클라이언트로부터 요청을 받고 응답을 하는 데 쓰이는 클래스1
서블릿에 대한 설명 중 이 한문장이 제일 간단하면서도 와닿았다. 서블릿은 그냥 클래스다. 처음 이 개념에 대해 배울 때 갑자기 많은 용어들이 나와서 엄청 복잡해 보였는데 저 설명이 그 복잡함을 일축시켜주었다. Servlet의 라이프 사이클은 init(), service(), destroy()2로 구성되어 있다. 서블릿은 서블릿 컨테이너에 의해 초기에 생성되고 요청별로 재사용 된다. (물론 중간에 바꿀 수도 있다)
- 서블릿에 대한 추가적인 설명
Servlet은 generic interface이고HttpServlet은 HTTP에 특정하게 적용되는Servlet인터페이스를 확장하는 sub interface임- Servlet 기술은 JSP와 Spring MVC와 같은 웹 기술에서 핵심적인 기술
Servlet Container
서블릿 컨테이너는 서블릿을 제어하는 자바 어플리케이션.
다른 어떤 설명보다도 위의 설명이 제일 간단했고 예시로는 Tomcat, Jetty 등이 있다. 서블릿 컨테이너가 제공해주는 추가적인 기능은 아래와 같다.
- Commnication Support
서블릿이 웹 서버와 통신하는 것을 쉽게 해줌. ServerSocket 생성, port listening, stream 생성 등의 작업을 맡아서 진행 - Servlet Lifecycle Management
서블릿의 생명주기 관리(init(),service(),destroy())를 해줌으로 자원 관리에 대한 걱정을 할 필요 없음 - Multithreading Support
요청을 받을 때 마다 자바 스레드를 컨테이너가 만들고, 요청이 완료되면 스레드가 종료됨. Thread Safety에 대해서는 책임져 주진 않으니 주의해야함. - Declarative Security
보안 관련 설정을 하드 코딩 하지 않고 web.xml 파일로 할 수 있도록 도와줌 - JSP Support
JSP Code를 Java로 바꿔주는 역할
Filter
Servlet과 함께 사용되며 요청, 응답 데이터를 전처리하거나 후처리 할 수 있음
- 필터는 주로 요청/응답의 헤더 변경, 인증, 로깅과 같은 비지니스 로직과는 다른 공통적인 관심사 처리를 위해 사용됨
- Spring Boot Framework에서 Client로부터 오는 요청/응답에 대해서 최초/최종 단계의 위치에 존재함
Spring Boot 적용
Servlet을 Spring Boot에 추가하는 방법
@WebServlet과 @ServletComponentScan3을 이용해서 Servlet 등록이 가능하다. 그러나 우리가 굳이 Servlet을 등록할 일은 없다.
왜냐하면 Spring Boot는 FrontControllerPattern으로 구현되어 있어 자동으로 등록되는 Bean인 DispatcherServlet에서 어떤 Controller로 매핑되는지 확인후 요청을 넘겨주기 때문에 우리는 Controller만 등록해서 사용하면 된다.
자세하게 어떻게 등록되어 있고, 어떤 순서로 호출되는지는 조금 뒤에 살펴보자
Filter를 Spring Boot에 추가하는 방법4
크게 Bean 으로 등록하는 방법과, Classpath scanning으로 자동으로 등록하는 방법 두가지로 나뉜다.
FilterRegistrationBean을 통해 세밀한 설정으로 Filter 추가 (Bean 등록)1 2 3 4 5 6 7 8 9 10 11 12
@Configuration public class MyFilterConfig { @Bean public FilterRegistrationBean<MyFilter> myFilterRegistrationBean() { FilterRegistrationBean<MyFilter> registrationBean = new FilterRegistrationBean<>(); registrationBean.setFilter(new MyFilter()); registrationBean.addUrlPatterns("/*"); // Set the URL patterns for which the filter should be applied registrationBean.setOrder(1); // Set the order in which the filter should be executed (if multiple filters are registered) return registrationBean; } }
Filter인터페이스를 구현한 클래스에@Component를 붙여서 Bean으로 등록하여 추가 (Bean 등록)1 2 3 4 5 6 7 8 9 10 11 12 13 14 15 16 17 18 19 20 21 22 23
@Component @Order(1) public class TransactionFilter implements Filter { @Override public void doFilter( ServletRequest request, ServletResponse response, FilterChain chain) throws IOException, ServletException { HttpServletRequest req = (HttpServletRequest) request; LOG.info( "Starting a transaction for req : {}", req.getRequestURI()); chain.doFilter(request, response); LOG.info( "Committing a transaction for req : {}", req.getRequestURI()); } // other methods }
@ServletComponentScan과@WebFilter어노테이션으로 Filter 추가 (claspath scanning)@ServletComponentScan어노테이션을@Configuration이 붙은 클래스나,@SpringBootApplication이 붙은 클래스에 달아 주면@WebServlet,@WebFilter,@WebListener가 붙은 클래스를 자동으로 내장된 서블릿 컨테이너에 등록해준다.(빈으로 등록됨)
1
2
3
4
5
6
7
8
9
10
11
12
13
14
15
16
17
18
19
20
21
@SpringBootApplication
@EnableFeignClients
@EnableJpaAuditing
@ServletComponentScan
public class VirtualofficeApplication {

	public static void main(String[] args) {
		SpringApplication.run(VirtualofficeApplication.class, args);
	}

}

@WebFilter(urlPatterns = {"/*"})
@RequiredArgsConstructor
public class AddUnityPacketIdFilter implements Filter {

	private final ObjectMapper objectMapper = new ObjectMapper();
	private final String packetIdFieldName = "packetId";
  ...
}
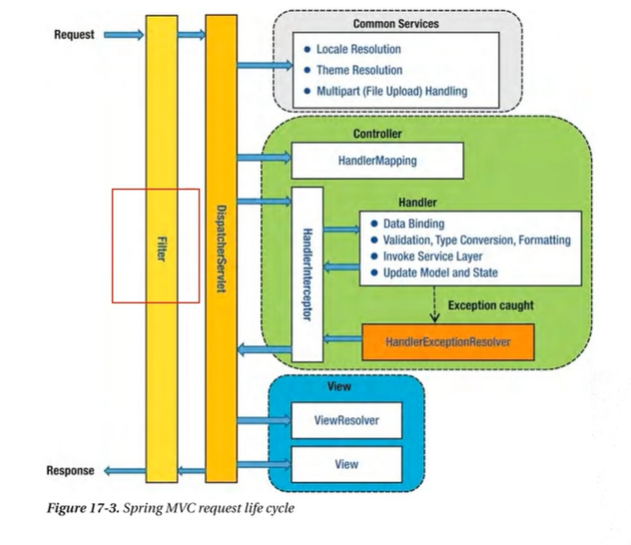
Spring Boot에서 request와 response 처리 흐름도
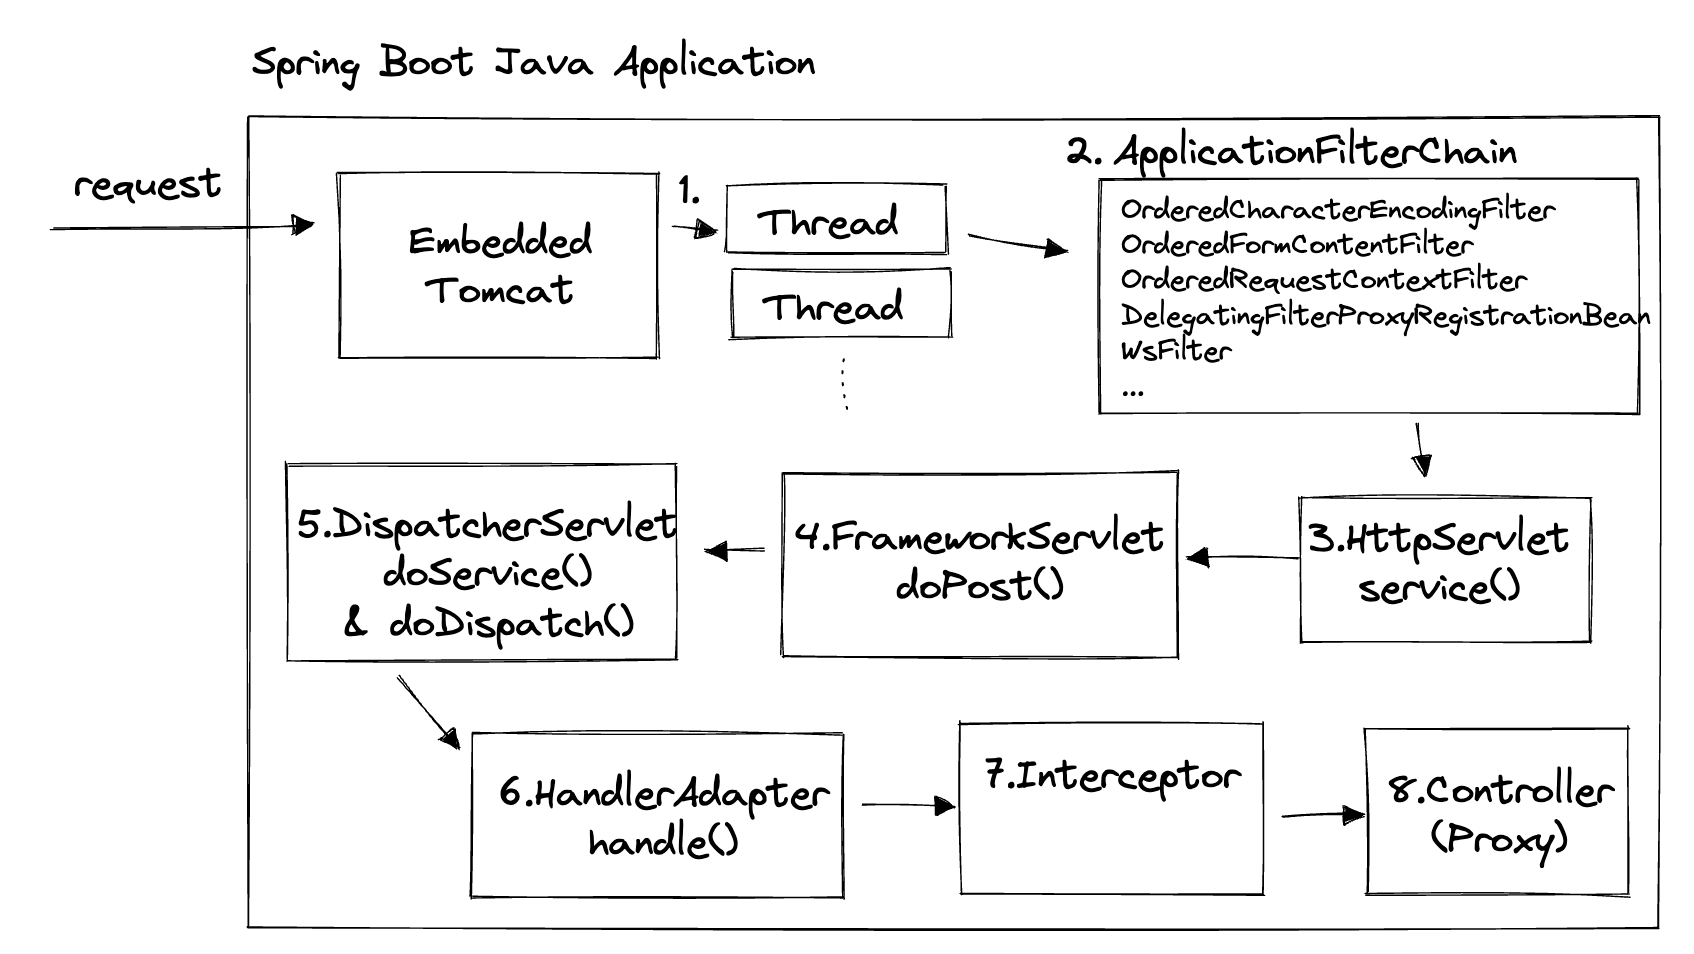 위의 이미지를 참고해서 실제적으로 어떤 클래스들이 호출되고 처리되는지 살펴볼 것이다.
- Tomcat에서 request를 처리할 Thread를 생성
ApplicationFilterChain에 등록된 Filter들을 하나씩 적용함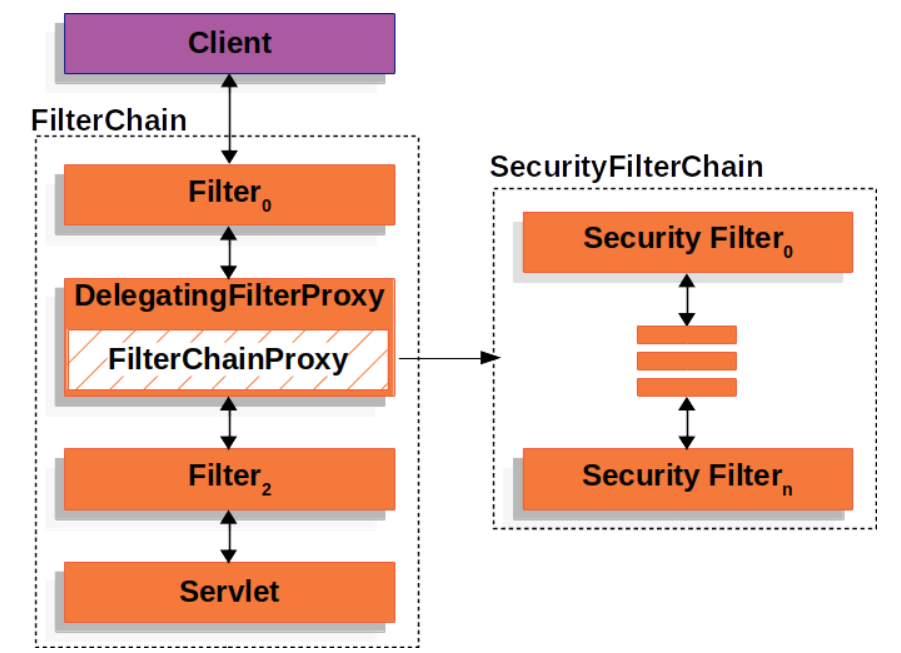 Tomcat(=Servlet Container)에 등록된 Filter들을 하나씩 호출하고, 여기에는 springSecurity의 Filter들을 가지고 있는 FilterChain도 포함되어 있다.(
DelegatingFilterProxy를 통해 해당 Filter들로 요청이 흘러감)- 등록된 Filter들을 다 호출한 후,
ApplicationFilterChain에서HttpServlet인터페이스의service()를 호출 FrameworkServlet의doPost()호출(HttpMethod가 Post인 경우임. Get인 경우doGet()호출)DispatcherServlet의doService()호출 후,doDispatch()호출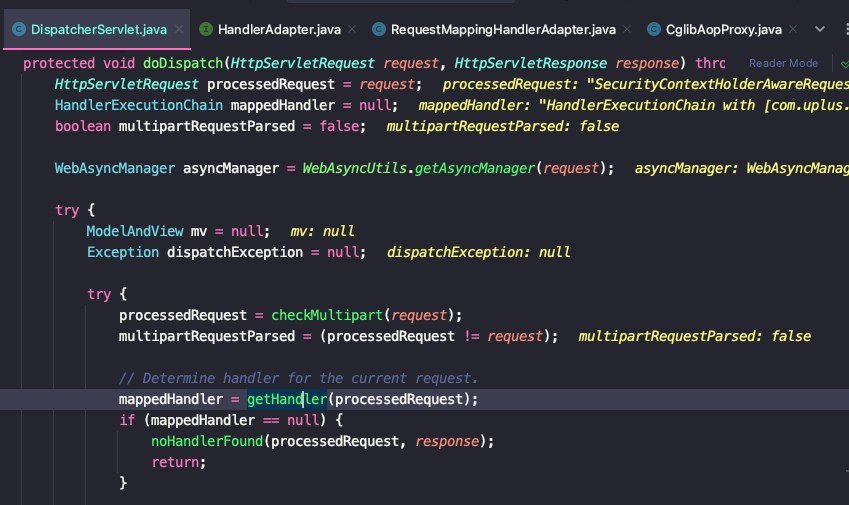 여기서 해당 요청이 어느 handler에 매핑될지를 결정함(
getHandler())HandlerAdapterinterface의RequestMappingHandlerAdapter인스턴스의handle()호출
여기서 해당 요청의 데이터를 핸들러의 파라미터 타입에 맞게 값을 변환해줌- Controller를 Proxy로 래핑하여, target 클래스(=controller, =handler)를 호출하기 전의 MVC Interceptor와 AoP Interceptor 의 기능이 동작
- target 클래스(controller,handler)의 로직이 호출됨
그 후 response는 그대로 반대로 다시 거쳐서 나가게 됨
참고