Flutter 앱 개발 기본
앱 개발 방식
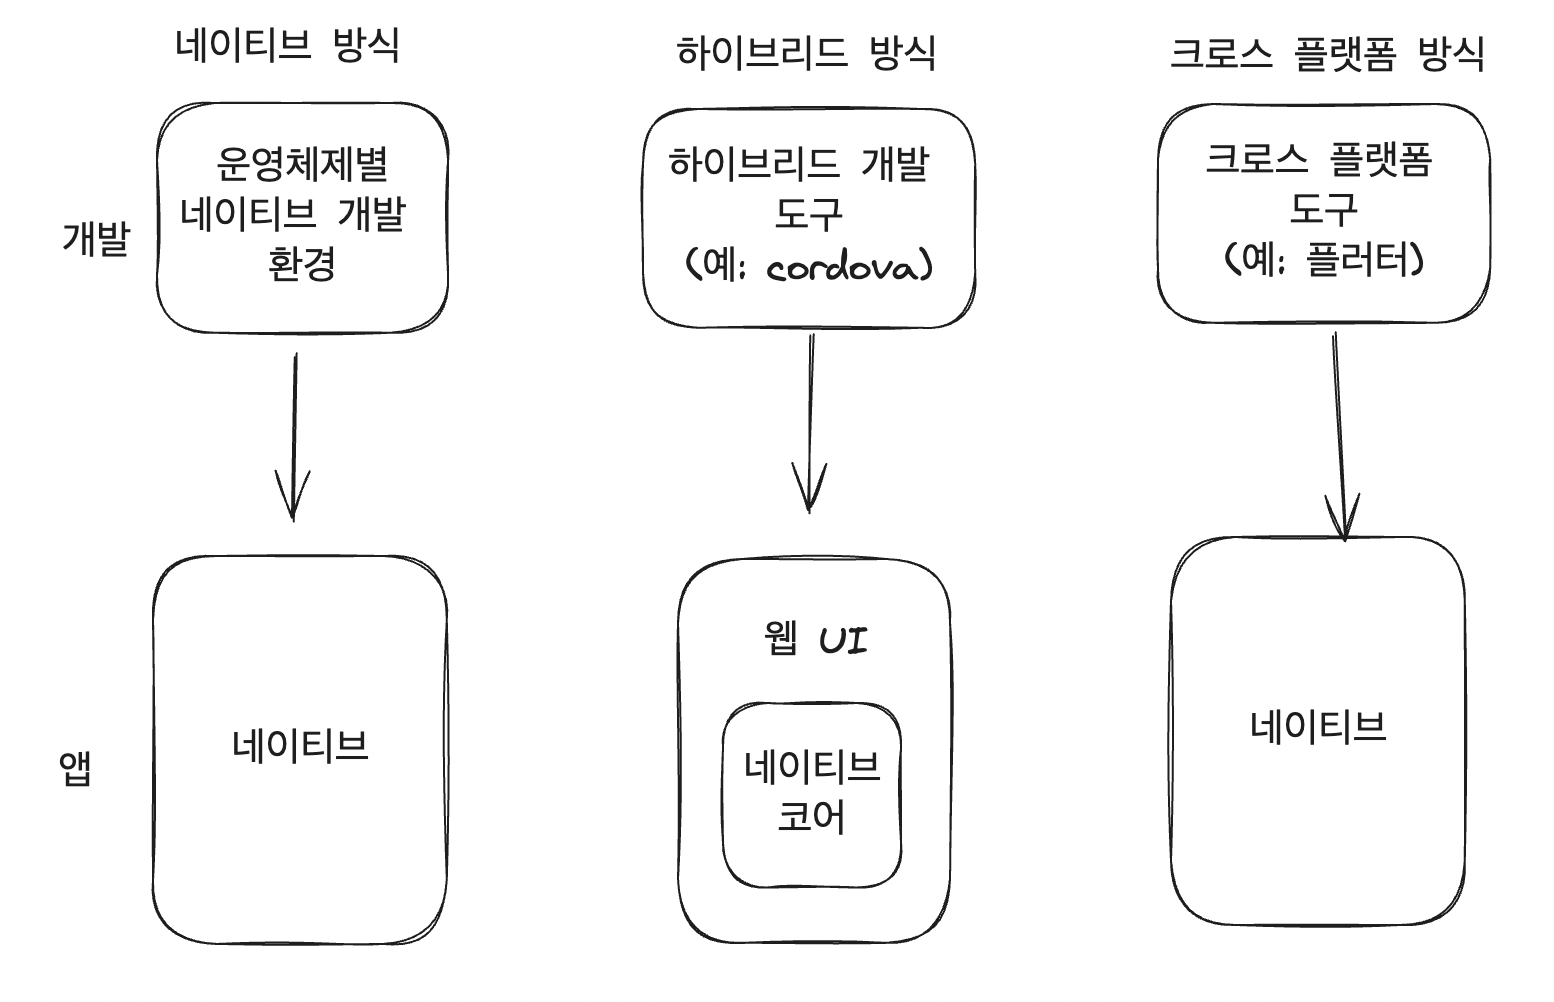
스마트폰 앱은 크게 네이티브, 하이브리드, 크로스 플랫폼 방식으로 개발된다. 사실상 스마트폰 운영체제는 안드로이드와 iOS로 양분되어 있는데 Flutter는 두 운영체제에서 모두 돌아가는 앱을 한번에 구현 가능하다.
- 네이티브 방식 : 안드로이드나 ios 같은 플랫폼 자체에서 제공하는 개발 환경으로 개발
- 안드로이드는 개발도구로 안드로이드 스튜디오, iOS는 XCode
- 하이브리드 방식 : 웹 기술로 앱 화면을 만든 후 네이티브 기술로 감싸서 앱 형태로 포장
- 기존의 웹 기술을 활용하고 빠르게 앱으로 변환할 수 있기에 빠른 앱개발 가능. 그러나 네이티브 성능에 미치지 못하고, UI 또한 별도로 만들기에 네이티브 앱 느낌이 안남
- 크로스 플랫폼 방식 : 한 번 구현하여 안드로이드나 iOS 등 각 플랫폼용 앱을 만듦
- 빌드할 때 네이티브 코드로 변환되어 네이티브 방식과 거의 같은 성능 보장
UI 디자인
Cupertino와 Material 디자인은 유명하게 사용되는 Flutter widgets 들이다. Flutter의 이 2가지 위젯은 많은 UI 컴포넌트들을 제공해주지만 시각적 디자인과 UX, platform emulation 등에서 다르다.
Material Design
- Google이 만듦
- Android, iOS, Web, Desktop apps을 만들때 사용 될 수 있음
Cupertino Design
- Apple이 만들었고 Apple의 Human Interface Guidelines에 기반을 두고 있음.
 Material Design
  Cupertino Design
샘플 프로젝트로 살펴보는 Flutter앱 구조
1
2
3
4
5
6
7
8
9
import 'package:flutter/material.dart';

void main() => runApp(MyApp());

class MyApp extends StatelessWidget { ...생략... }

class MyHomePage extends StatefulWidget { ...생략... }

class _MyHomePageState extends State<MyHomePage> { ...생략... }
- 상태가 없는 정적인 화면은
StatelessWidget을 상속 - 상태가 있는 동적인 화면은
StatefulWidget을 상속 - State 클래스를 상속받은 클래스를 상태 클래스라고 부름. 상태 클래스는 변경 가능한 상태를 프로퍼티 변수로 표현
- main 함수가 진입점이고, 거기에서 MyApp을 초기화하여 앱을 실행함
1
2
3
4
5
6
7
8
9
10
11
12
13
14
15
16
17
18
19
20
21
22
23
24
25
26
class MyApp extends StatelessWidget {
  const MyApp({super.key});

  // This widget is the root of your application.
  @override
  Widget build(BuildContext context) {
    return MaterialApp(
      title: 'Flutter Demo',
      theme: ThemeData(
        colorScheme: ColorScheme.fromSeed(seedColor: Colors.blue),
        useMaterial3: true,
      ),
      home: const MyHomePage(title: 'Hello World'),
    );
  }
}

class MyHomePage extends StatefulWidget {
  const MyHomePage({super.key, required this.title});

  final String title;

  @override
  State<MyHomePage> createState() => _MyHomePageState();
}
StatelessWidget을 상속한 클래스에서는StatefulWidget을 home 프로퍼티로 갖도록 하면서MaterialApp클래스를 초기화- MyHomePage 클래스는 State object를 통해 상태를 가지게 됨
1
2
3
4
5
6
7
8
9
10
11
12
13
14
15
16
17
18
19
20
21
22
23
24
25
26
27
28
29
30
31
32
33
class _MyHomePageState extends State<MyHomePage> {
  int _counter = 0;

  void _incrementCounter() {
    setState(() {
      _counter++;
    });
  }

  @override
  Widget build(BuildContext context) {
    return Scaffold(
          appBar: AppBar(
            backgroundColor: Theme.of(context).colorScheme.inversePrimary,
            title: const Text('Tab'),
          ),
          body: Center(
            child: Column(
              mainAxisAlignment: MainAxisAlignment.center,
              children: <Widget>[
                const Text('You have pushed the button this many times:',),
                Text('$_counter',style: Theme.of(context).textTheme.headlineMedium)
              ],
            ),
          ),
          floatingActionButton: FloatingActionButton(
             onPressed: _incrementCounter,
             tooltip: 'Increment',
             child: const Icon(Icons.add),
          ),
        );
  }
}
- Scaffold 클래스는 머티리얼 디자인 앱을 만들 때 뼈대가 되는 위젯임. 즉, 머티리얼 디자인 앱을 만든다면 MaterialApp -> Scaffold가 기본 형태
- Scaffold 클래스 안을 보면 appBar, body, floatingActionButton이 정의되는데, appBar는 상단의 제목과 메뉴를 표시하는 영역을, body는 컨텐츠 영역, floatingActionButton은 버튼을 누르면 작동할 동작을 정의할 수 있음
버튼을 눌렀을 시
_incrementCounter함수가 실행되고, 해당 함수 안에는setState함수가 정의되어 있는데 이 함수가 호출될 때마다 _MyHomePageState 클래스의 build가 다시 호출되면서 화면이 다시 그려지게 됨- 보통 State 클래스나, Stateful 클래스에다가 개발을 많이 하게 됨
참고
- Cupertino or Material
- 오준석의 플러터 생존코딩
This post is licensed under CC BY 4.0 by the author.
